Introduction
📩 Note: This Project is a part of 13 week long DevOps Micro Intership(DMI). If you want to learn DevOps with hands-on practice and live projects for free, you can follow the YouTube Playlist by Pravin Mishra.
This is my first 2-tier application architecture deployment project. I have good experience working on static and monolithic applications, but I haven’t worked on a 2-tier application until now. This project is my first real exposure to RDS, VPC, subnets, route tables, and security groups.
I have always been curious about how networks and cloud services work because they are invisible and hard to “feel.” But after learning the concepts of networking and cloud services, I finally understand the basics. For the first time, I deployed a 2-tier application with RDS as the database server and an EC2 instance as the web server, utilizing VPC, subnetting, and security groups to make it more secure.
Project-Writeup
For this project, we need knowledge of EC2 instances, VPC, subnets and subnet groups, route tables, and security groups. We also need to create multiple private and public subnets and select multiple availability zones to ensure high availability of the resources. In this project, we’ll create EpicReads, a WordPress blog hosted on Amazon Web Services (AWS) using a Virtual Private Cloud (VPC), Linux EC2 instance, and a managed RDS MySQL database.
This guide walks through everything from network design to domain name setup, so you can replicate the architecture for your own projects.
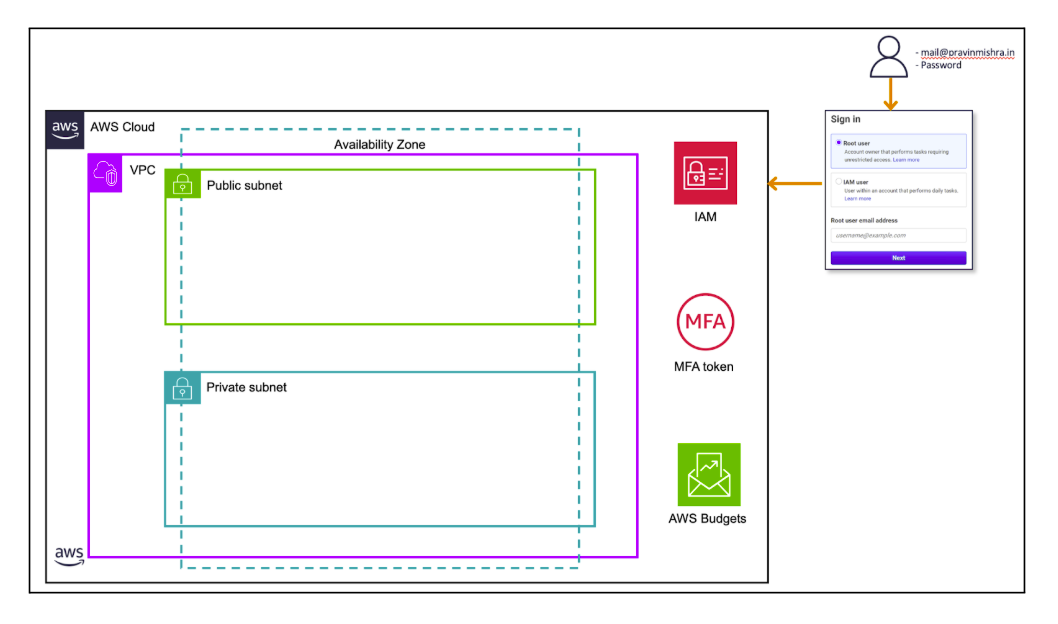
🏗️ Part 1: Designing the Network – Creating an AWS VPC
A Virtual Private Cloud (VPC) is the foundation of any modern AWS deployment. Think of it as your own isolated data center inside AWS where you control subnets, routing, and access.
1️⃣ Create the VPC
-
Log in to the AWS Management Console.
-
From the region selector (top right), choose the region closest to your audience for better performance.
-
In the search bar, type VPC and open the VPC Dashboard.
-
Click Create VPC → VPC only.
-
Give it a Name tag (for example
EpicReads-VPC) and specify an IPv4 CIDR block—for instance10.0.0.0/16. -
Leave Tenancy as
Default. -
Review and click Create VPC.004-create-vpc.png
-
Your private network is now ready and visible in the VPC Dashboard.
2️⃣ Add Public & Private Subnets
Subnets divide your VPC into smaller networks.
- Public subnets host resources that need internet access (like our web server).
- Private subnets host internal services (like databases).
-
In VPC Dashboard → Subnets → Create Subnet.
-
Select the
EpicReads-VPC. -
Create at least:
-
One public subnet: Assign a CIDR block (e.g.,
10.0.0.0/24) and choose an Availability Zone (AZ). -
Two private subnet: Assign a different CIDR block (e.g.,
10.0.1.0/24) and a different AZ to ensure high availability.
-
Tip: Using multiple AZs keeps your site online even if one AWS data center goes down.
3️⃣ Internet Gateway & Route Tables
Public subnets require a path to the internet.
Attach an Internet Gateway (IGW):
-
Go to Internet Gateways → Create Internet gateway.
-
Name it (e.g.,
EpicReads-IGW) and click on Create internet gateway. -
Select a newly created VPC and click on Attach to VPC and then choose your VPC from the list. Set Up Route Tables:
-
Go to Route Tables → Create Route Table.
- Create two tables: Public-RT and Private-RT.
-
In Public-RT → Routes → Edit routes, add:
- Destination:
0.0.0.0/0 - Target: Your IGW.
- Destination:
-
Go to Route tables → Select Public Subnet → Subnet Associations → Edit subnet associations.
-
Under Subnet Associations, attach only the public subnet(s).
Result: Only public subnets can reach the internet; private subnets remain isolated.
4️⃣ Secure the Network with Security Groups
Security Groups act as virtual firewalls.
- Go to Security Groups → Create security group.
- Name it
WebServer-SG. - Add inbound rules:
- HTTP (80) – Source:
0.0.0.0/0(allow all users to access your site) - SSH (22) – Source: your IP address only (for secure administration) or
0.0.0.0to allow traffic from any network.
- HTTP (80) – Source:
- Add Outbound rules:
- All traffic – Destination :
0.0.0.0(allow outgoing traffic to any destinations and protocols)
- All traffic – Destination :
🖥️ Part 2: Launching the Web Server – Ubuntu EC2 Instance
Our next step is to launch a Linux EC2 instance inside the public subnet to host WordPress.
1️⃣ Launch the EC2 Instance
-
In the AWS console, search EC2 → Launch Instance.
-
Choose Ubuntu Server 24.04 LTS as the Amazon Machine Image (AMI).
-
Select t3.micro (Free Tier eligible).
-
Under Key pair, create a new key pair and download the
.pemfile. -
In Network settings:
- Choose EpicReads-VPC and the public subnet.
- Enable Auto-assign public IP.
- Attach the WebServer-SG security group.
Click Launch Instance.
- Copy the Private IP address to access the EC2 instance through ssh.
2️⃣ Connect Securely via SSH
On your local machine:
- Change the permissions of the SSH key to 400 (read permission for the owner and no permissions for the group or others), then log in to the server using the SSH key.
chmod 400 /path/to/your-key.pem
ssh -i /path/to/your-key.pem ubuntu@<EC2-Public-IP>
You’re now inside your cloud server!
🌐 Part 3: Installing WordPress on the EC2 Instance
1️⃣ Update & Install Apache
sudo apt update && sudo apt upgrade -y
sudo apt install apache2 -y
sudo systemctl start apache2
sudo systemctl status apache2
Test by visiting http://<EC2-Public-IP> in your browser.
2️⃣ Install PHP & MySQL Client
sudo add-apt-repository ppa:ondrej/php -y
sudo apt install -y mysql-server
This provides the PHP runtime and MySQL client tools required for WordPress.
3️⃣ Download and Configure WordPress
- Change the working directory to
/var/www/html/.
cd /var/www/html
- Download the Wordpress package .
sudo wget https://wordpress.org/latest.tar.gz
3. unzip the Downloaded file latest.tar.gz.
sudo tar -xvzf latest.tar.gz
- change the ownership and permission of the directory
/var/www/html/wordpresstouser:groupwww-data.
sudo chown -R www-data:www-data /var/www/html/wordpress
sudo chmod -R 755 /var/www/html/wordpress
5. change the working directory to wordpressand create a wp-config.php file from wp-config-sample.php.
cd wordpress
sudo cp wp-config-sample.php wp-config.php
We’ll edit this file later with database credentials.
🗄️ Part 4: Creating a Managed MySQL Database with RDS
1️⃣ Create a DB Subnet Group
- In the AWS Console, search RDS → Subnet groups → Create DB Subnet group.
- Name it (e.g.,
epicreads-subnet-group), add a description, select EpicReads-VPC. - Choose multiple subnets in different AZs for high availability.
2️⃣ Launch the Database
-
Go to RDS → Databases → Create database.
-
Choose:
- Engine: MySQL 8.0.42
- DB instance class: db.t4g.micro
- Storage: 20 GB (General Purpose SSD)
- Template: Free tier
-
Under Settings:
- Database identifier:
database-1 - Master username:
admin - Auto-generate the password and store it securely.
- Database identifier:
-
Network settings:
- Select EpicReads-VPC.
- Public access: No.
- Choose the epicreads-subnet-group.
-
Under VPC security groups, create a new group
DB-SG.
3️⃣ Configure DB Security
Allow only the web server to connect:
-
Go to Security Groups → DB-SG → Edit inbound rules.
-
Add:
- Type: MySQL/Aurora (3306)
- Source: The WebServer-SG.
This ensures the database is private and accessible only from the EC2 instance.
4️⃣ Link WordPress to RDS
Get the database endpoint from the RDS console.
On the EC2 instance:
export MYSQL_HOST=<your-db-endpoint>
mysql -u admin -p wordpress
Enter the password and check:
show databases;
exit;
Edit wp-config.php:
define('DB_NAME', 'wordpress');
define('DB_USER', 'admin');
define('DB_PASSWORD', '<your-password>');
define('DB_HOST', '<your-db-endpoint>');
For added security, generate unique keys at https://api.wordpress.org/secret-key/1.1/salt/ and replace the default keys in the config file.
5️⃣ Finalize WordPress Deployment
sudo cp -r wordpress/* /var/www/html/
sudo chown -R www-data:www-data /var/www/html
sudo systemctl enable apache2
sudo systemctl restart apache2
Visit http://<EC2-Public-IP>/wp-admin and complete the WordPress setup by choosing a site title, admin username, and password.
🎉 Your WordPress dashboard is live!
🌍 Part 5: Linking a Custom Domain via Cloudflare
To make your site accessible via a friendly URL:
-
Log in to Cloudflare and open your domain dashboard.
-
Go to DNS → Records → Add record.
-
Select:
- Type: A
- Name:
epicbook(or your preferred subdomain) - IPv4 address:
<EC2-Public-IP>
-
Save the record and wait for DNS propagation.
Now you can access your site at
https://epicbook.yourdomain.com.
✅ Wrapping Up
You’ve successfully:
- Built a secure AWS VPC with public and private subnets,
- Deployed a Linux EC2 web server,
- Created a managed MySQL database with RDS, and
- Linked WordPress to a custom domain name.
This architecture delivers:
- Scalability – Easily add more EC2 instances or upgrade the database.
- Security – Database is private; only the web server can connect.
- High Availability – Multi-AZ subnets protect against data center failures.
Next Steps
- Enable SSL/TLS certificates using AWS Certificate Manager or Cloudflare.
- Configure automated RDS backups.
- Add a Content Delivery Network (CDN) for faster global performance.
💡 Takeaway: By combining AWS VPC, EC2, and RDS, you’ve built a production-ready WordPress site—perfect for growing blogs like EpicReads.
Happy cloud building! ☁️